-
Routerbot v2
 Before you start reading about v2 let me mention that Routerbot v3 is on the way and the first video about it is already available (it is called “the most hacked router in the world ever”).
After a long timeout (sorry, too much work at my primary job) v2 is finally here. It answers number of questions asked after v1, such as AP mode (so you can run it outside your home network), web camera support, web interface, using existing openwrt-based operating systems as routerbot OS and more. The new image and patch (for those already running their own routerbots) are provided in this post.
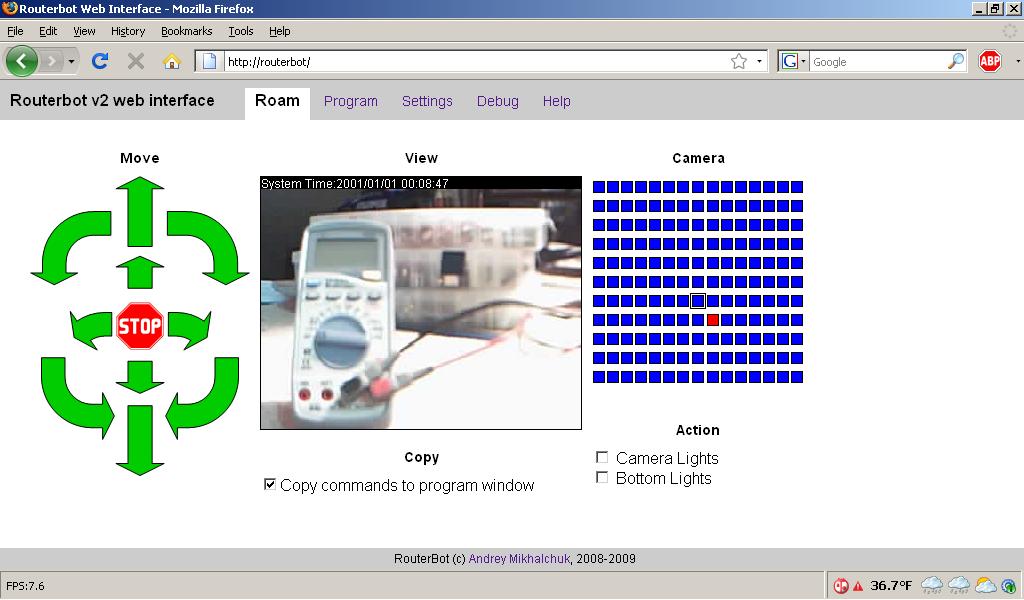
In the new version the web interface is made the primary way to operate routerbot. Command line mode is not forgotten either, just using web browser is an easier way to see the world with your robot’s eyes. Below you can see the snapshots of the web interface. I recently got one of those tiny netbooks, so the entire interface is now optimized for 1024×600 resolution.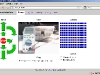 The first snapshot demonstrates the “roaming” mode of operation. From this screen you can command your robot and direct it wherever you need. Also you can see what a webcamera sees, turn on/off lights (so you can explore dark matters), and point the camera to the objects you’re most interested about (the multimeter reading in this case). The camera is controlled using field of view matrix so you can quickly reposition camera to any point. The checkbox below the web camera view when checked makes all commands you issue in roaming mode being copied to the next screen related to programming mode.
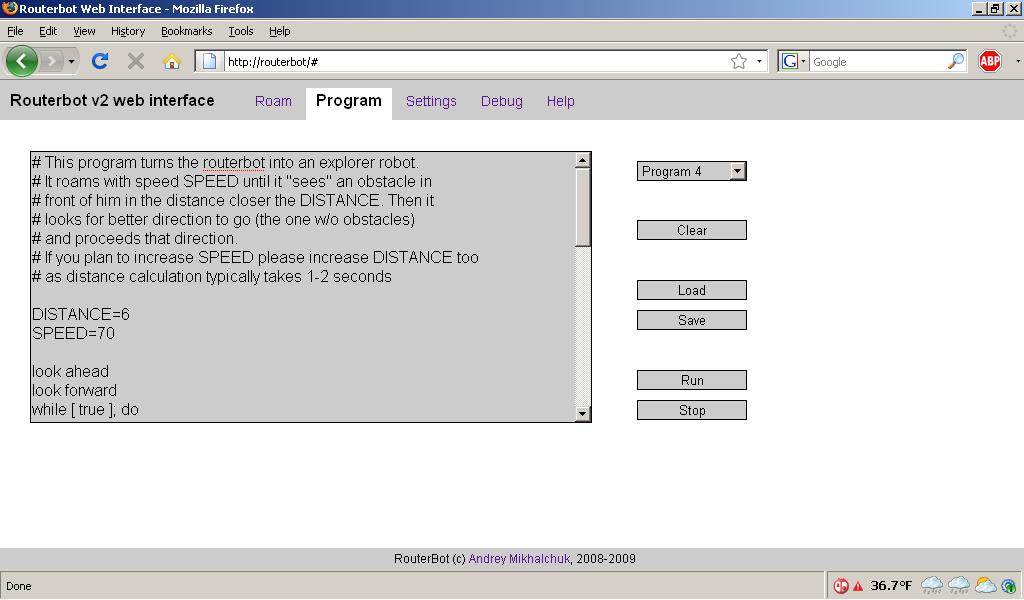
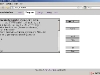 In the programming mode you can use any of the available 20+ commands to control robot in batch mode + all power of shell scripting language. You can enter any sequence of commands in the textarea mix it with shell flow control operators, save into one of 5 memory slots and run it. I particularly recommend trying program #4 that turns your routerbot into an explorer. It uses the rangefinder to detect obstacles and avoid them.
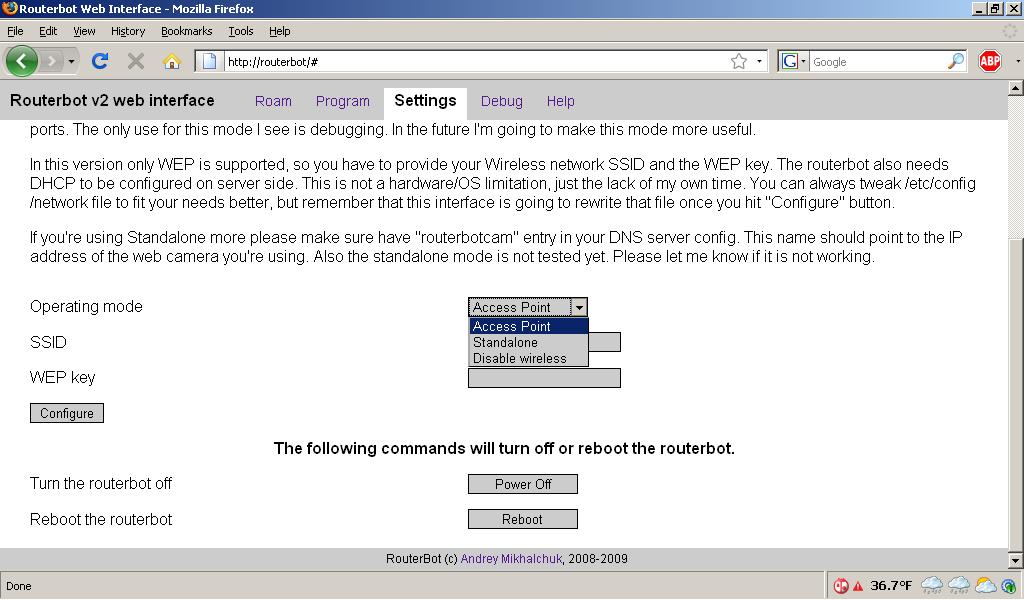
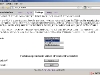 The next screen is settings. I made it as simple as possible, so you don’t have to mess with too many network settings. The main feature is the “Access point” mode which is made default now. In this mode the routerbot works as an access point so you can use any computer equipped with a wifi card to connect to it anywhere you want. Just specify the SSID and the wep key, hit configure and in 15 minutes you’re ready to go. The default SSID is “Routerbot” and the web key is “01234567890123456789012345”. The standalone mode is the one from v1. In this mode the routerbot connects to your local wifi network. Again, specify the SSID and wepkey of your local network and hit configure. WARNING! I don’t have my own wep network for now, so this mode is not tested. It should work, but … Finally there is “Disable wireless” mode that turns the wifi off completely. In this case you can only access the routerbot using serial console (if you added one) or 192.168.1.235 IP address via cable connected to port LAN 1. BTW, if you have a web camera you have to connect it to port 4 only and configure to obtain the IP address from DHCP. Alternatively you need to add routerbotcam DNS entry and point it to 192.168.1.236.
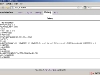 The next screen called Debug and is interesting only for those who is developing new commands for the routerbot (you can add new commands to utils.sh file). It displays unix output from all commands issued in roaming mode.
 The final screen is help which is obviously providing some help information on how to use your new routerbot. As you can see more commands are introduced in v2 and the most important command is get_distance(). This function returns the distance to the closes obstacle the routerbot is looking at. This function opens new possibilities to operating the routerbot in programmed mode. In v2 you can program not only simple sequences of actions, but also programs that contain conditional operators. Take a look at script #4 – it illustrates this idea.
A few notes before you update the OS.
- Both complete OS image and patch are provided. I recommend full reflash, just make sure you backed up /routerbot, /www and /etc directories from your existing router before proceeding to be able to revert to previous version. Also if you’re applying patch make sure haserl package is installed on your router.
- New release actually contains both v1 and v2. You can choose any version to run by editing /routerbot/version.sh file. Unfortunately I won’t be able to provide support for v1 in the future, but I’ll keep it. v1 also has the web interface, but it is less functional then the one from v2.
- v2 supports many features that you might not have implemented in your router yet. For example
- New version is for 4×4 robots (4×4 works on carpets much better then 4×2 or 3×2, but requires more powerful battery and power supply 12v 2A). If you have only two motors just assign them to front wheels in config.sh and forget about the other two. Everything should work just fine.
- v2 supports web camera. I used this one, but you can get something similar from ebay for about $50. Actually the camera I used produces not very good image, so you might be lucky to get a better one. The camera should be plugged to LAN 4 and obtain IP address from DHCP. Or you can statically assign 192.168.1.236 to it. For AP mode that would be enough to work. For Standalone mode you will also need to add routerbotcam->192.168.1.236 to your DNS. WARNING! If you don’t have any web camera to webpage will take much longer to load (about 10 sec). To fix that just point routerbotcam to some IP that runs a web server.
- v2 supports rangefinder from Maxbotix (entire EZ series should work fine). If you don’t have one program #4 won’t work. You will also need TX line connected from SSC-32. I’ll provide more details later.
- v2 supports LEDs so you can light up your robot. If you don’t have any LEDs attached they won’t work 🙂
- When you reflash the routerbot used cable connected to LAN1 and IP address 192.168.1.1. When you work with the routerbot using LAN use 192.168.1.234 and also connect to LAN1. LAN1 is your emergency line for routerbot. It should work in all modes and always statically assigned to 192.168.1.234.
- The web interface is optimized for Firefox only. IE might have problems. I might be interested in fixing this issue in future releases, for now just use Firefox v3.
You can install new OS by reflashing your router with this image: Routerbot v2 image or you can install this patch: Routerbot v2 patch. In order to install the patch delete /routerbot folder, copy patch to the router, unpack it and move patch/routerbot and patch/etc to /. Make sure you have /routerbot, /etc and /www backed up in some safe place.And the most important thing about this release is “THANK YOU!!” to all who inspired it by sending tons of emails/comments. Thanks you very much!
That’s it for now. I plan to release some schemes, photos, video and minor updates to the code later.
38 Responses to “Routerbot v2”


 RSS
RSS Contact Us
Hello Andrey,
when I plug my servos into the SSC-32 is this correct?
CAMERA_PAN_SERVO=5
CAMERA_TILT_SERVO=4
ENGINE_RIGHT_FRONT_SERVO=8
ENGINE_LEFT_FRONT_SERVO=9
ENGINE_RIGHT_REAR_SERVO=10
ENGINE_LEFT_REAR_SERVO=11
If I wanted to add a the lights and underside lights or posibly a laser what numbers do I use?
I’m thinking of adding a small coil gun and laser (for fun)
Kelly,
It depends on what PWM port are you going to use. The numbers you assign to the variables reflect the port number on the controller. If you camera pan servo is plugged to port 5 then leave it to 5.
When you attache LEDs (in v2) check their voltage – most probably it is around 3.6V while the servo controller provides more. So just connect two of them in series to each port or use voltage divider.
v2 has function “on” that turns on power on the given port, so you can easily add laser or lights to the robot. Similarly there is “off ” that turns power off. You can also use those functions in program mode.
Andrey
Ok everything Vr2 seems to be working quite well :)… I figured out the resistor split.
I’m very surprised at the power that routerbot vr2 has. I do have one slight problem.. as soon as routerbot powers on and goes into the OS all of the servos spin continuously..
Goooood 🙂 You can fix the servo situation by editing config.sh file and setting _STOP parameters to match your servos. Here is how.
Hello Andrey
My quest still goes on. So far I managed to get one button working (thank’s to you version system it’s easy to have my own v3 and yours switching over as I wish). The strange thing is that button work only if prior pressing it I execute from another browser session do.cgi script. Funny:) If I will loose any hope with code I will kindly ask for your help. But I have another important question – how can I enable eror.log for http daemon? Or any aother way to see what goes on with cgi scipt when it’s executed from main.js?
Bets regards, and many thanks for my new hobby!
Janis
Janis,
I have no good explanation for the “button effect”. What browser are you using? Can you zip the /routerbot/v3 folder and send it to me? BTW, v3 is coming so you will have problems with this version number. You can call it 2j or something like that to avoid future code incompatibility.
To my best knowledge the httpd included with openwrt (which is actually busybox) doesn’t support error.log. What I used for debugging is adding -x flag to the shell interpreter (the first line in util.sh should look like “#!/bin/sh -x”) and making calls to the functions in that file directly from command prompt.
Andrey
Hi Andrey,
Long time no talk. My tracked Routerbot is working very nicely and I have added additional sensors by using my custom PIC controller board. I want to use the router and web control on another project(wifi controlled overhead crane(scale) This time I don’t want to use the SSC-32. The web interface sends an ASCII character set to the SSC to cause a movement..i.e. #10P1500 to stop the servo on port 10. How can I change this instruction set to something I can read using the SERIN command in pic basic pro like “[255,2,1]”, where 255 is the address, 2 is the output port and 1 is the state. Then when the PIC reads this data a simple if/then statement turns on the appropriate output. I used this setup to build a serial r/c unit using two pics and rf modules, works great!
I’m sure there must be some way to duplicate this with your system.
Thanks,
John
Hi John,
Nice to see you again! I hope you like the new site.
All commands are implemented in file /routerbot/v2/bin/util.sh. This file is written in shell script and you can modify it any way you want using any text editor. You can find more information about shell script here. There are also a lot of good books and web pages about it. All lines in that file looking like “cmd <something>” are sending something to the serial interface. If you change all those lines with something that fits your controllers it should work just fine. You can also implement additional commands specific to your robot in the same file.
Hi Andrey,
Nice to talk to you again too. The website is very nice and makes it easy to find info.
I have been able to edit the /util.sh file and change what data is being sent when the ‘arrows’ are pressed. I also customized the arrow layout to better suit my ‘CraneBot’ application. My PIC reads this data and turns on the corresponding output. So far so good ! I also changed the “camera/bottom lights” button labels and added two more custom buttons which turn on/off ssc-32 outputs 12 and 13. My problem is this: Currently the buttons send #1xxH or L, were xx = channel number. I want to send a custom serial string when a button is turned on and another string when it is turned off. For example, when the “camera lights” is turned on, I want to send cmd “a”. When it is tuned off, a cmd “b” should be sent. The next button would send cmd “c” for on and cmd “d” for off and so on.
Could you please write me an example of how to modify the util file to do this ?
Thanks alot,
John
John,
CraneBot! I definitely wanna see it. Please let me know when you will want to publish some pictures about your current progress! Can you also publish a short description of your project here on robostuff?
I see several approaches to the problem you described. Here they are:
1. Replace the buttons with HTML checkboxes. Each checkbox should have Javascript that triggers on onchange event like this:
<input type=checkbox onchange="if( this.checked ) cmd( 'a' ) else cmd( 'b' )">2. If you want to stay with the buttons you can do something like this:
<script>var state = true;
</script>
<input type=button onclick="state = !state; if( state ) cmd( 'a' ) else cmd( 'b' )">
3. You can keep changes on server side only I think util.sh mod like the one below should work fine:
export STATEcmd1() { # this is the command you call from web interface like on() or turn()
if [ $STATE ]; then
cmd 'a'
STATE=false
else
cmd 'b'
STATE=true
fi
STATE=false
}
Hey Andrey,
This mod is proving to be very difficult for me. My experience with this type of programming is zero. I’m sure what I want to do is very simple…
I want to use check boxes to control various relays so if I click on the box the output turns on(which my PIC will take care of). Each of my check boxes will have a different name which when turned on or off will send a unique serial string. For example, check box #1 sends “a” for on and “b” for off. Check box #2 sends “c” for on and “d” for off and so on.
I don’t understand how to mod the html file and the util.sh to work together.
Please help. When I get this ‘CraneBot’ running I will gladly post info and pics. The crane is a scale model ‘overhead’ crane that I built from scratch using extruded aluminum. The hoist is 24vdc and can lift about 100 Lbs !
John
John,
The .html mod and the mod in util.sh are not supposed to work together. I just proposed three different ways to solve the problem. You need to choose only one. It looks like first method works best for you, so you don’t have to make mods to util.sh.
BTW, there are checkboxes that turn on/off lights in the default web interface – you can use them as example of the first approach.
Andrey
BTW, I did try using the examples you provided with no luck. I must be missing something.
Thanks,
John
Hi Andrey,
I figured out how to customize what characters are being sent with the buttons. I completely modified the web interface with the addition of more checkboxes. I am now able to control any PIC outputs using this setup without the need for the SSC-32. I put the “CraneBot” project on hold for a minute while I sorted out the control. My initial goal was to not require the SSC-32 for control as it would get expensive to need one for any other telepresence projects such as the crane. As I said, with your help I now have the PIC controller receiving data and controlling outputs. I made the router “modular” by adding connectors so it was easy to remove from one robot and mount to another….BUT…I don’t like the large size of the PCB(uncased) and it also requires a fair amount of power !
So…We know the router’s serial port is 3.3v TTL. Well prior to the routerbot project, while on my wireless quest I discovered(and purchased) a couple of 2 way wireless modules called “Xbee Pro”.
These are a very small 24mm x 30mm, 3.3v device that require 4 wires to operate: 3.3v, gnd, Tx and Rx. I wired one Xbee to the router’s serial port 2 and also stole the 3.3v power for the Xbee from inside the router.
The other Xbee radio is connected to my previously mentioned PIC controller where all commands are received and implemented–wirelessly ! With this setup the robot can be WAY smaller and therefore require much less power. I can also very easily control multiple robots with one wireless router base. Each robot simply has it’s own ID. There is no noticeable latency and the Xbee wireless connection is rock solid for about 300′.
Although this mod is quite different than your routerbot, it does use your web interface and shows another way to approach the project. I would be happy to share any info or pics regarding what I have done so far.
Thanks alot for a great website, not many people are home building web controlled robots, so your info is great !
Good job Andrey,
John
Hi John!
I had some experience with XBee in this project: http://www.youtube.com/watch?v=1pcAsEUOW9Q. XBee is a very impressive product, though I found it a bit difficult to use in harsh RF environments like my office, especially when using high baud rate like 115200.
Initially I used WRT54GL PCB to reduce the project cost, though you are right – it draws too much power and occupies too much space. If you want something “greener” you can take a look at Gumstix (expensive!) or Alix/WRAP (same size as WRT54GL, but less expensive then gumstix and not as power hungry).
May I have some photos of your project? 🙂 I wonder if you have your project webpage I can link to. Or, if you want one, you can use space on robostuff.com.
Andrey
Hey Andrey,
I really liked your Pleo Xbee mod, very cool. As far as other wifi to serial modules, there are a few to pick from. As far as embedded controllers, there are lots to pick from. Which brings up a good question. I totally see why you originally chose to use the Wrt54g for it’s low price and ease of firmware upgrade, BUT is it possible to use something else. For example, Lantronix makes a wifi to serial device server that can be found here…http://www.lantronix.com/device-networking/embedded-device-servers/matchport-bg-pro.html. Could this be adapted to work with your web interface ?
I have one more question. As I explained before I have an awesome wifi to xbee link working with my routerbot. I want to be able to read telemetry from the robot, for example battery voltage. I can quite easily read the value and transmit it from the robot xbee to the xbee which is connected to the WRT54g serial port(Rx,Tx and GND). The data I assume is then being sent across the wifi network, but how do read it. Obviously, this must be done within the web interface. Is there a simple sort of way to read a received ASCII value to the interface ?
Also, I would be happy to send some pics and any info regarding my Web Interface-Wifi-Xbee-PIC project, just send me an email telling me where to send them.
Thanks again,
John
Hey so I already have v1 on my routerbot because I made it before you had v2 published but I really wanted to use it in AP mode without having to completly reflash it and put v2 on it. Is there any simple way to change this just by changing some settings and if so could you tell me? thanks alot
Joseph
Joseph,
Take a look at v2 patch. In file patch/routerbot/v2/bin/util.sh line 404 there is a function that reconfigures the routerbot into AP mode. If you copy this function contents into corresponding configuration files your routerbot will become an access point.
Andrey
Good day!
I would just like to ask you on the web server you installed on your openwrt for the web interface. I would need to use lighttpd for my undergraduate student project, and I am a bit confused. Thanks! 😀
Khristian,
I was using the webserver that is a part of busybox. It is not very functional, so I totally understand your desire to install lighttpd. The only problem I see with that is the disk space. If you need too many modules for it it might require more disk space then WRT54GL has. Otherwise that is absolutely possible.
Regards,
Andrey
I have for a while been considering making a home security robot for my final year university project and yours seems to be a good starting point. I have a few questions though:
1) How long do the batteries last with the router,camera,motors etc…?
2) How many devices can i control/read (thinking additional servos,sensors etc).
I get the feeling i may have to ditch the router idea due to power requirement issues however your hack seems to be quite a neat solution (and i have plenty of spare routers lieing around ;)).
Thanks
Rupert,
1) I was using an old 9.6V 600mah battery and it was good for at least 15min of intensive use. You can get a 4500mah battery on ebay for <$50 and it should last much longer
2) The SSC-32 can support up to 32 PWM devices (such as servos) and up to 4 analog/digital inputs. If you need more inputs I’d recommend using Arduino Mega. It has 16 inputs, 14 PWMs and more (total of 54 I/O pins)
BTW, You can reduce the power consumption by underclocking the router’s CPU and APM fine-tuning.
Andrey
Hi Andrey
it has been a while since I last worked on my version of your routerbot v2.
I just received the camera and server from the link you provided above in the artical. is this the correct camera? it has built in tilt and pan? I would hate to take it apart and ruin it.
do I remove the motors? from inside??
my routerbot is almost finished! I am able to show my freinds it drive around.
Wow, great project! i saw a video online and have been researching routerbots ever since! i ordered a few continuous rotation servos, a controller and a max232 module, and while im waiting i was hoping to start tinkering with the firmware and web interface. however, all the links to firmware on your site are dead, are you still offering the routerbot os for download? thanks in advance, ardy
Hello Ardy,
How is your progress? Any luck moving your router yet? 🙂
I just checked the links on this page and they are working fine: (see the last paragraph). Please let me know when you found the dead links and I’ll fix them.
Good luck with your project!
Andrey
Hey Andrey
Im having trouble finding the software to run the routerbot could you send me a link to it
Hi Austin,
You may need either patch or the complete firmware image. Please refer to the Routerbot v2 page. The links are provided in the last paragraph:
Andrey
Hi Andrey,
I would like to put your RouterbotOS on my WRT54G-TM (which is the same hardware as the WRT54GS v.3). Could you provide an image for me? Also, I’m an Electrical Engineer with plenty of experience with hardware. I’m looking to build a routerbot for Linux knowledge. My ultimate goal is to be able to create a project like yours from scratch starting with OpenWRT as the base OS. Could you provide me with the source code so I can try building it by myself? I really like your site and would like to start my own with some of my projects as well. Thanks.
Hi Bryce,
You can get the OpenWRT source code from their website. The sources for routerbot are available here: (click here). The most part of the project is written in shell code, so you can use the binary image, then ssh to the routerbot and see the shell sources installed in /routerbot directory.
Good luck!
Andrey
Hi Andrey,
I would like to ask some questions of your project Routerbot v2 so that i could understand things which I’m confuse in technicalities and some software parts (like Shell script, CGI) in this project.
I’m currently working on the project, the parts are still the router WRT54GL and with motors, microcontroller,serial port of the router.
I’m using the OpenWRT kamikaze firmware, i didn’t follow your procedures on how to make the project because i have just read it last week and i found some confusions on what i am doing.
I will tell you what i have done so far from my router.
1. OpenWRT Kamikaze firmware is installed
2. I have already updated, installed stty and can already send data to the serial ports.
So far thats all i know.
Im trying to implement the access point which is web based like the routerbot v2.
I’m not good at linux, never tried CGI and Bourne Shell Scripting but don’t worry i’m currently studying it.
I hope you’ll help me or give me trips to understand this things. I’m also reading the site you give which teaches BASH shell script. I have little knowledge of this because i have research it and time by time i’m gonna understand them.
Anyway, I have downloaded the image, packages and also read routerbot project.
Is it okay if i won’t use the image that you gave?
Are their other things that i will configure besides stty packages? i think i don’t have the haserl package. Do i need it in order to make CGI work?
I have scanned the packages /routerbot and i’m confused. I don’t know how the program structure works. Can you tell me the first thing when the router is turned ON?
How to run the shell scripts automatically when after turning on the router?
From what i have understand that when accessing the http://routerbot then cgi script is run (do.cgi) and the cgi script will make the config.sh run, util.sh, etc, I am correct?
Can you help me understand the flow of the structure? how it works.
Hello John,
Here are brief answers to your questions:
– yes, you should not use the image if you already have openwrt installed. You should download the patch (which is the difference between the “stock” openwrt and “routerbot os” lesser the packages). You can download the patch as tar.gz file from the routerbot v2 announcement page
– you need haserl in order to make the simplest form of cgi-bin work. You can install it with “opkg” package manager from network
– the whole thing about how the routerbot works is explained on the FAQ page, you can find there how each command is processed from the moment you clock something on the web page to the moment when servo starts rotating.
Let me know if problems.
Regards,
Andrey
Good day,
So I was successful in reflashing my 54GL with version 2 but I cannot telnet into it. I’ve tried the standard telnet from windows and also tried with putty both ssh and telnet. Any suggestions?
n routerbot V2, I have a question about parameter passing from js to cgi to util.sh to cmd() (inside util.sh).
For everytime a button is pressed cmd()(inside main.js) document.getElementById( “cmd_output” ).src = “/cgi-bin/do.cgi?action=” + urlencode( cmd ); is executed, parameter are sent to do.cgi but im confused about the +urlencode(cmd), making the value to ascii code?
Once the parameters are passed to do.cgi, util.sh is executed and these variables $FORM_post_form_action, $FORM_action and $FORM_post_form_content were did this come from?
From the
Is this correct $FORM_post_form_action = post_form_action (from hidden)?
And the last parameter passing to cmd()(inside util.sh),
cmd() {
echo “CMD> $1″
echo “$1″ >> /dev/tts/1
}
Where did $1 get a value from the do.cgi?
I’m new to this, help me understand this parts.
I’m just starting this project soon, and I was wondering, I’ve seen the link for the guide for building Rev 1, but is their one for Rev 2?
Hi Michael,
Unfortunately there is not guide for v2 and there never will be because I’m already working on v3 🙂 I gonna publish DIY details for v3 as soon as it is ready.
Andrey
Hey. Great project.
However.. I would rather that you documented the modding of open-wrt. Did you do any c++ and also how to compile the buildroot ant sutch 🙂
Hi martinmunk,
Tweaking openwrt is a too big topic to cover it here. I may do it later though.
If you’re interested about mods done to the openwrt you can try dissecting the patch – it contains all mods done to the original openwrt.
Also using C++ for routers is a really bad idea because to run C++ code you need to install additional libraries and that takes too much precious flash storage space on the router. So C is your best choice. For the same reason I was using pure shell scripting for the web interface and not PHP or similar.
Regarding the buildroot there are instructions on openwrt website, but if you say they are confusing I’d definitely agree with you. There are a few posts related to openwrt in my personal blog http://andrey.mikhalchuk.com if you’re interested about more information related to Linux/OpenWRT.
Andrey
Andrey
Hello Andrey,
Thank you again for your great talent in robotics. I was so amazed that read your info, blog, CV and even info on Minestream company website. You are great master. By the way, how are you, how is job?
I understand that you are very busy and have the lack of time to answer the millions of letters; otherwise I hope you would help me with your kind advice.
Finally I have got parts from Lynxmotion and completed brains of my routerbot!!! Thank you much for detailed instructions. It was some difficulties in serial interface voltage divider, but I have read your post 100 times and did everything step by step – it works!!! Now my SSC-32 is working wirelessly, router was flashed via LAN promptly at first attempt! GREAT!
And now I have a little bit problems. I want to build 4WD platform with IP camera on the board with the opportunity to use Roborealm vision program. The problems are the following:
• The 4wd platform drive. I want to build smth like Lynxmotion 4WD Rover http://www.lynxmotion.com/Category.aspx?CategoryID=30 , using powerful motors (not servos. Continuous servos unavailable in Ukraine!!!!))). The problem is how to operate with motors, when SSC-32 supports servos only. I have been researching much and found the way to connect the motors via motor controllers only. I want to save costs and solder it myself. Is it possible to do by using simple motor driver like L293D? Or could you advice more simple way to operate with motors (like with the servos, smoothly) using SSC-32
• The IP camera. Could I use the Roborealm in conjunction with your router developed software? How to make the robot to recognize the world with camera (without attaching the sensors if possible).
The 4Wd drive compatibility problem is much important I want to build powerful off-road station to operate the robot outdoors. The Lynxmotion 4wd is tooooo much expensive to deliver to my place, not saying about the device price in 400$ (ridiculous).
Please note – I am newcomer and complete dum in robotics, but very fascinated in electronics from childhood. I am a lawyer so had no real possibility to get opposite education. Now I am trying to explore it myself – so much interesting)))
I hope you can help me with your professional advice!
Thank you so much again!
P.S.: Ukraine got new President)))) hope the politic and economic situation would be better now…
Kind regards,
Slava