-
6. Configure your routerbot
 Unfortunately most servos you can get for a reasonable price are not exactly precise. Each servo has its own parameters and the many of them (in our price range) do not allow any adjustments. For instance when you send a command to the servo to return to its middlepoint (or stop rotating in the case of continuous rotation servos) the parameters of this command will be different for different servos even if they have the same model number. Some will stop at 1500 PWM, some at 1570. Fortunately in the “Routerbot OS” your can easily fix that problem and here is how you can do that. Before you proceed please make sure you have read the Routerbot v1 project outline.
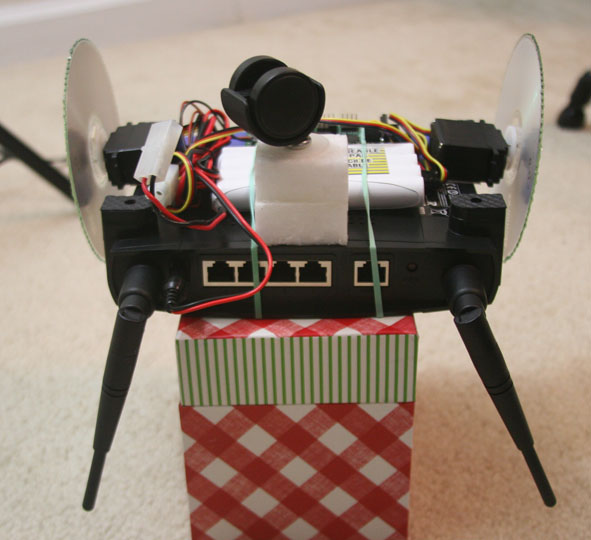
(If you haven’t read the project outline you can find it here)In order to tune the routerbot find an appropriate stand to put the routerbot on top of it so its moving parts do not touch anything. A large juice box would make a great stand, for instance. Then telnet or ssh to your routerbot and cd to /routerbot directory in two shells (or in two cmd windows in Microsoft Windows). Open config.sh file in one shell/window (let’s call it “config” window and the other windows will be “command” window) and adjust the parameters using the following procedure:
- Change the numbers in *_SERVO parameters if you want to connect the servos not as it was described in this guide, but in some other order
- In the command window run the following command in the command prompt:
stop. Both wheels should stop. If they don’t keep modifying parameters ENGINE_LEFT_STOP and ENGINE_RIGHT_STOP until stop command works correctly. There is about 30 PWM tolerance for the servos I recommended, but you need to be very precise. Send the routerbot forward and if it doesn’t go straight adjust the STOP parameters again. - In the command window issue this command:
look forward. The camera should turn so it looks straight. If it doesn’t then adjust CAMERA_PAN_FWD parameter. - In the command window exec the following:
look leftand thenlook right. These commands should make the camera look left and then right. In those positions the servos should not rattle, otherwise decrease CAMERA_PAN_DELTA parameter - In the command window try these three commands:
look ahead, look up, look down, look back. Issue those commands one by one and after each command listen if the servos are silent or not. If they rattle then adjust the following parameters correspondently: CAMERA_ELEVATION_FWD, CAMERA_ELEVATION_UP, CAMERA_ELEVATION_MAX, CAMERA_ELEVATION_MIN. You might also want to adjust those parameters to increase angles if your servos support more then 180 degree rotation. (In v2 replace _ELEVATION_ with _TILT_) - Put the routerbot to the floor and issue the following command:
turn right90. The routerbot should turn exactly 90 degrees to the right. If it doesn’t then adjust RIGHT_ANGLE_TURN_SPEED parameter a little.
That’s basically it. When you’re done with this step you’ll have something like you can see in the original routerbot video. I also recommend you to backup your config file. If you reflash the router later your config file will be lost without the backup.
If you want to extend the set of commands the routerbot understands take a look at the /routerbot/util.sh file. I’d be happy to incorporate your mods into the next version of the routerbot OS if you send them to me.If you used v2 for reflshing the routeryou will get the web interface. Click on the Help tab and you will see the basic set of commands the routerbot understands. You can run them in the command line (via SSH or Telnet) or use them to program the routerbot via web interface or batch files.
Good luck!
9 Responses to “6. Configure your routerbot”
 RSS
RSS Contact Us
hi i have completed the project v2.0 its verry cool, it took a wile but it works, my Q. is how do you edit/mod the router so it can controll more servos? and change perameters on the existing ones?
iv read the Configure your routerbot chapter a thousand times lol,
i use a windows p.c. with putty to telnet the router, but i can not figure what exacly to type in the prompt to edit anything, please help me! p.s. im makeing a sort of a tank with it and im using an airsoft gun hooked to a speed control, so i only use like 4 or 5 commands, also how can you reconstruck the web interface? thanak you for you time.
Ashley,
The SSC-32 board can handle up to 32 servos, so you have plenty outputs even to make a hexapod chassis for the routerbot. You need to edit util.sh file. More information about how to do that is here: http://robostuff.com/diy-projects/routerbot/routerbot-v1/routerbot-v1-faq.
To edit files the best editor in Unix is “vi”. Here is more info about it: http://www.uic.edu/depts/accc/software/unixgeneral/vi101.html
Andrey
hello Andrey,
for setting the stop parameters am I supposed to use vi man to edit the stop parameters? I acidentally bricked a router because I was too good in vi man…
Hi Kelly
I don’t think editing the robot scripts would brick the router. I’d recommend adding the serial port and “unbricking” the router from serial interface. Most probably just some config file got messed up and it prevent the router from network configuration correctly. Please send me the output from your console if you’re still having troubles with it.
Andrey
*wasn’t (I wasn’t too good with vi man)
hi i was wandering if you can help me in more detail, if i was to add another servo to the project how do i write a command to run it?
Hello Ashley,
Take a look at this file: /routerbot/v2/bin/util.sh (this file is on your reflashed router). It contains all the code for manipulating the servos. You need to implement your own functions to send commands to your servo using shell script.
If you want to control that servo from the web interface you also need to modify it. The web interface-related files are located in /routerbot/v2/www/ directory. You will need to patch index.html file to include new web controls. Plain HTML + some Javascript is used in that file.
These are two main files you will need to edit.
Regards,
Andrey
hi thank you for all your help, I am defiantly a noob. I was wandering if you could email me with more help on customizing your project to suite my needs, thank you
ashleysul@msn.com