-
How to control Pleo wirelessly via bluetooth
 in the <$700 price range (Pleo price is around $330 shipped). It has a huge potential which is limited by the fact it is completely standalone. I tried to fix this by adding bluetooth interface to it. This mod allows issuing commands to Pleo from virtually any bluetooth-enabled device, including many cell phones, communicators and generic computers. It also allows retrieving information from Pleo on-the-fly, like sounds it hears, pictures it sees etc.
Before you continue reading this post please acknowledge that this mod is not approved by Ugobe and most probably will void the warranty. Also there is always a chance that something will go wrong and you might damage your robopet. If you’re going to implement this mod you are the only one responsible for damaging this very expensive toy. I’m providing the information below only as a personal experience for educational purposes.
And here is how to make it:
Step 0. First of all let’s order the parts.
- 1x bluetooth module, for instance this one (FireFly): http://www.sparkfun.com/commerce/product_info.php?products_id=8550
- At least one (and I recommend two in case you spoil the first one) 538-51021-0700 Molex 1.25mm Connect RECEPTACLE 7 POS: http://www.mouser.com/Search/ProductDetail.aspx?qs=hSmm4fxMIuNmj4UzNb1XZA%3d%3d
- At least 4 (but I’d take 20) of those: 538-50058-8100 Molex 1.25mm Connect SOCKET 28-32 BULK: http://www.mouser.com/Search/ProductDetail.aspx?qs=TEDqGy%252b%2f3mEfDxUH2CbEAw%3d%3d
- Bunch of wires, preferrably of different color, 2-3″ long
- 2x 2-pin fem headers (optional). Or you can brake them from this: http://www.sparkfun.com/commerce/product_info.php?products_id=115
You will also need
- Basic soldering iron
- SD card of decent size (128Mb is enough, but 512 is better)
- Cardboard cutter, pliers
It’ll take about 7 days and $80 to get all the stuff to appear on your desk. Now let’s proceed:
Step1. Open the serial interface
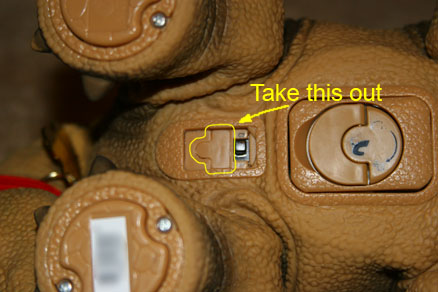
Pleo’s serial interface is a part of 7-pin connector hidden under a plastic cover next to the power switch. Taking out this cover is the most difficult operation in the entire process since the cover is very well glued to the surroundings. It took me about 15 minutes of intensive operations with knife to take it out. You can use Dremel or something similar to do this operation faster, but then you will loose the cover. If you accurately cut it out with a knife or cardboard cutter you can always glue it back so Pleo will be as new.Step 2. Assemble the 7-pin connector
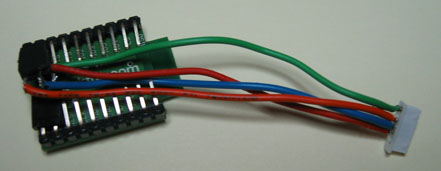
The connector opened under the cover has 7 pins but you need just 4 of them. If you have a crimping tool you can use it, otherwise just solder the wires to the terminals and insert into the housing at positions 1, 3, 4 and 5 as shown on the picture.Step 3. Connect wires to the module.
Use headers #5 from the list or just solder directly to the bluetooth module the wires from the connector as following:
#1 on adapter goes to GND pin on the module
#3 on adapter goes to RX pin on the module
#4 on adapter goes to TX pin on the module
#5 on adapter goes to 3.3V pin on the module
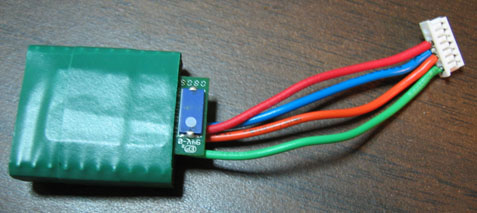
Optionally you can also lower the module profile by bending its pins by 90 degrees as shown on the picture. Use your own perception of beautiful to decorate the adapter and make it look like a tag. Alternatively you can put it inside Pleo next to the battery compartment, but this will require some more surgical work on pleo and may make it look messy.Step 4. Connect the FireFly adapter to Pleo and control it remotely via bluetooth
This step is straightforward and doesn’t require any further explanation. Just a few hints:
- For some reason in a few cases Windows was unable to find SPP service available on the FireFly bluetooth module we just connected to Pleo. When I tried to connect to it using one bluetooth adapter embedded into my laptop it didn’t find the SPP and USB adapter I plugged to the same laptop via USB found it just perfectly. So if this hack doesn’t work with one bluetooth try another. I think the problem was that FireFly returns its service class as 0 by default. You can fix this by connecting to the adapter (via working bluetooth adapter for instance) and issuing the following commands:
- $$$
- SC,1101
- R,1
- When you connect to Pleo use 115200 8N1 port settings
- FireFly’s default pin code is 1234
- I use external bluetooth adapter that provides 300ft range. If you need more you may consider using XBee adapters as it is described in this great work: http://www.grip-online.com/en/pleo_hack/xbee/2.
- When you connect the adapter to Pleo it will keep minimal moving. It will accept your commands, but still will perform its program. If you want to keep it motionless you need to copy appropriate .urf file to the SD card and insert it into Pleo before powering it on. If you don’t know how to create such file you can always get one from DinoMite distribution.
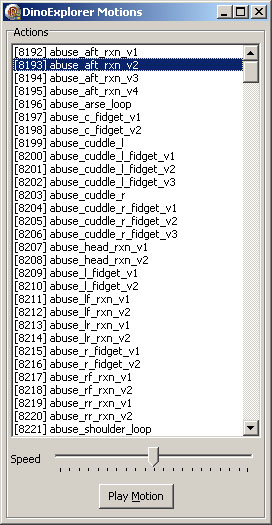
You can control Pleo via almost any terminal program that supports serial connections. For instance putty and SecureCRT will work just fine. Also there is DinoMite and possibly other tools that can work with Pleo via USB cable. All of them will work with it wirelessly too. DinoMite actually has one glitch: it allows to select port only in 1-16 range, while windows may assign port number above 16 to the bluetooth SPP.
I wanted to let me kids to play with wireless Pleo, so none of the tools from pleoworld worked for me (they are not very user friendly) and I wrote my own.
You can also see video demonstrating this Pleohack on youtube.com


 RSS
RSS Contact Us