-
Looking for an extra Pleo battery pack? Build your own!
The future is unclear. It is especialy unclear for creatures facing extinction like Pleo. And despite some good news on Jetta taking over Pleo it is still uncertain if Jetta will continue Ugobe’s practice of releasing toys and not releasing spare parts for it or not. Battery always been among the weakest features of Pleo. It lasted only for half an hour and then happy user had to charge it for another 2-3 hours. Wouldn’t it be better is you have two battery packs and just swap them? Unfortunately Ugobe never made it so here we are: 30 min playtime, 3 hours chargetime. The purpose of this article is to set you free from this boring pattern. Surprisingly the battery pack you’re about to build is more functional and versatile then the original Ugobe pack.
DISCLAIMER. As usually I’m reminding you that I’m just sharing my experience and not encouraging you to make these risky experiments. If you something will go wrong – this is all your fault, not mine. But it worked for me and I see no reason why this won’t work for you.
For this simple project you need the following simple parts:- 6x high-capacity rechargeable batteries. You can get two of those for instance: http://www.amazon.com/Card-Tenergy-NiMH-AA-Rechargeable/dp/B0018QYB64/ref=sr_1_2?ie=UTF8&s=electronics&qid=1244606734&sr=8-2.
- One 6xAA battery holder. If you can’t find one in localRadioshack here is your backup plan: http://mouser.com/Search/ProductDetail.aspx?qs=qTvYfFJlUoNwR25rguKLug%3d%3d
- Sharp knife, glue, dremel, soldering iron, wire, side cutters, hot glue gun
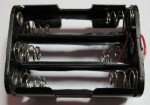
Once you got ahold of the 6xAA holder and tried it on Pleo you much instantly become happy about what you see – it fits! Unfortunately not everythign is so easy. The Pleo battery block has very special contact pads. Also if you insert batteries into the holder it won’t fit the Pleo at all. Let’s solve those inconveniences.
Contact pads
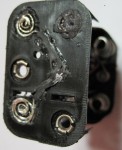
Pleo’s battery pack has 3 contacts on the bottom. Two of them are connected to the positive terminals os 6 AAs connected in series and the 3rd one is the negative terminal. In order to build this configuration from the battery holder do the following:
- There are two wires coming from the holder – get rid of them, don’t throw them away as you will need them for some soldering work.
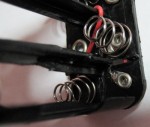
- Diagonally opposite from the terminals to where the wires were connected there are two connected battery terminals. Cut out the connection between them. The idea is to move the isolate the corner pad (outside the holder) so it will become the future negative terminal of our Pleo battery pack. You can’t use the one already isolated because … well, difficult to explain. Look the the holder geometry and you will understand.
- Connect the two terminals the wires were connected to. Just use the wire you didn’t throw away in the very first step. See the top view picture for details.
- And now some carving work. Use your favorite rotary tool (i.e. Dremel) or hot knife to make space for pads. I’d recommend to put the pads as deep into the holder as possible without damaging the case integrity. In the future you might want to add the “official Pleo battery holder latch” to the pack and this is when you will want the custom pack profile to be as short is possible. Similarly make deepenings for the wires that go to the pads.
- We already have the negative terminal for the pack. Use the deepenings you just made to connect the pads to the battery terminal next to the negative one. Fix everything with hot glue and sand flat. Of course you shouldn’t cover the pads with the glue, you need to cover just the wires and glue the pads to the holder.
- Charge the batteries, insert them into the holder and test the pack. It should provide around 8V between the negative terminal and both of the positive terminals. If it doesn’t – look for the problem. Just take out the batteries and start putting them back one-by-one starting from the negative terminal. With each additional battery measure the voltage between the negative terminal should rise but approximately 1.2V
So the first problem is done and you have the pack that has correct pads, correct polarity and looks nice. Now try to put it inside Pleo and realize it doesn’t fit.
Making the pack fit the Pleo
If you compare the pack you have just built to the original Ugobe plack you will find that in Ugobe’s pack the individual batteries are just taped to each other and there are no plastic parts in between them. Our holder however holds the batteries, so they don’t even touch each other. This extra space between the batteries makes our mission impossible and we need to take some of the plastic fragments out. Use a really sharp knife or a hot knife or dremel or nickel chromium cutter or laser cutter or the power of your mind to cut out the portions of plastic that separate three pairs of batteries and make the holder wider then we need. Be really careful as the sharp knife is a really dangerous thing. You also do not want to apply too much force and damage the holder structure, otherwise it will just fall apart and all your work will be lost. Once you’re done put the batteries back and try to insert the pack into Pleo. Jus ttry, do not actually insert!!
Final step
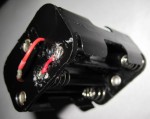
The longer red wire you can see on the photo is for extracting the pack from Pleo. Unlike the original pack that requires a latch to hold it in Pleo our pack is slightely bigger and holds itself just perfectly. The actual problem is not fixing it in Pleo, but rather taking it out of the toy. So attach something that would help you to extract the pack, measure the voltage (again, it should be around 7.2-8V), take a deep breath, insert the pack and turn on Pleo. In <10secons you should hear something from him/her. If you hear nothing – something is wrong and you need to recheck the pack. If everything is working fine – congratulations, mission accomplished. Now you got an extra pack of life juice for your favorite robotic toy. A few good things about it:
- You don’t need more then one pack of this kind. If the batteries discharged just take it out, replace the batteries and put it back.
- You can change the batteries not with the Ugobe charger (which is very unreliable from my prospective), but with a regular AA charger.
- You can use not Ugobe’s 2200mah batteries, but something more capable, like 2600 ones I recommended above.
I hope there will be some company that will like this list of the custom battery pack advantages and they will manufacture something like that. Pleo is only $154 now (“only” – comparing to its initial price tag) that makes it more affordable then before. Hopefully it will become more popular and widespread and making such a battery pack will be profitable.
One more thing to note is the necessity of using _rechargeable_ batteries. The problem here is that rechargeable AA batteries produce 1.2V output while the regular batteries will give you 1.5V each resulting 6×1.5=9V total from the battery pack which is 1.8V higher then Pleo got used to. I never tested Pleo with regular AA batteries and do not recommend this to anyone. However if you are not listening to warnings I would very appreciate if you share your experience. For sure you can put a voltage regulator in the power pack, but using it as is with regular 1.5V batteries … I just don’t know …IMPORTANT!! When I posted this article I was only using batteries charged as regular AA batteries in my regular charger. Later my primary Pleo pack failed (never leave Pleo turned on with the battery pack inside for longer then 1 day or your pack will die!!) I fixed with using the same approach. I.e. I replaced the original Ugobe 2200mAh batteries in the pack with 2600mAh fresh ones. Unfortunately it appeared that the original charger won’t charge the renovated pack. After further investigation I found thermistor in the original pack placed between the furthermost contacts on the pack. The thermistor has resistance of approx 14K at home temperature and 5K when the batteries get hot. So if you want to charge the pack with the original charger please solder in that thermistor, otherwise charge the AA batteries using regular charger. From my experience this thermistor doesn’t affect Pleo itself – the renovated pack worked just great. I’ll post more photos with of my recovered pack with the thermistor a bit later.
Where to move from here
If you like the hack you just made but looking for something cooler? Try connecting your Pleo to computer using bluetooth or controlling your Pleo with Wii nunchuck
13 Responses to “Looking for an extra Pleo battery pack? Build your own!”


 RSS
RSS Contact Us
[…] Looking for an extra Pleo battery pack? Build your own! […]
[…] Just swap batteries you say? Nope, the battery packs aren’t available. Fortunately, you can make your own pretty easily. The basic frame is a standard battery pack for 6 AA’s. There are only a few modifications […]
We tried this and have not had success yet. As you say, if you try non-rechargeable batteries, you would get too much voltage. We tried it but put a jumper in the last battery slot so we only used 5 batteries (7.5 volts). Pleo turned on, did his “Huh?” sound, and then went dead. Note that this is a sudden shut off and not the “slump over and go to sleep” that happens when he overheats or batteries get run down. We put in his real battery and he worked fine. We put in 6 rechargeable and he did his “Huh?” sound and went dead. We checked out 2 “real” batteries and measured 7.2 to 7.5 v and with a 33 ohm resister in series we measured .2 A. When we checked our homemade battery with 5 rechargeables and a jumper, it measured .2 A as well. One of our real batteries is working fine and the other lasts about 15 sec before Pleo goes to sleep. We are not sure what our next step will be. Suggestions welcome.
Hello,
I need some more information about your attempts. What brand/capacity rechargeable batteries are you using? Are you sure they are completely charged? Do you use custom-made pack like the one described in my post or you replaced the batteries in the original pack? How do you charge the batteries?
I also added one note to the original article regarding the thermistor – it is possible that it could be affecting your configuration. If you don’t have said thermistor try inserting a 14K resistor between the farthermost leads of you battery pack. Please let me know if that helps.
Did I correctly understand that 6 regular AA bateries work just fine? That would be good news.
Andrey
No, it didn’t work with regular batteries or anything other than the regular battery. There appears to be something in Pleo that is recognizing that the power source is not correct (amperage? voltage??) and it shuts down right after it powers up. We made the battery pack as per your directions above. We charged the batteries in their own charger thus did not use the thermistor that you mention above. It is possible that the batteries were not fully charged, but we did read the amperage and voltage prior to trying it. We used Energizer 2450 mAh 1.2V rechargable. I don’t recall the brand of regular AA’s that we used. We have ordered the brand you recommended but haven’t charged them up yet. Since the amperage and voltage checked out in the range of our true battery pack, we don’t know what Pleo’s safety mechanism is.
D,
I checked the default batteries – they are very standard. There is also no any advanced circuitry in the battery pack (except for the thermistor). I really have no idea what could be the problem as my pack built from Tenergy 2600mah batteries works just great. Could you please try installing the thermistor – maybe your Pleo requires it not just for charging but for normal operation too? Also there is a chance your Pleo has different protection against using non-standard packs. I know that in some countries Pleo is sold with LiPo packs. That means there are multiple variations of Pleos in the world and your Pleo could be using different power circuit (just a guess).
Andrey
Hey guys,
I need to know two things:
Can any one just tell me which battery cell terminal is connected to the third battery connection?? And what is the voltage between the +ve, -ve and the third connection when the battery is fully charged. I can’t figure this out because my battery is defective.
Also, where the thermistor is connected? Or what is the voltage across the thermistor when the battery is fully charged?
Without these I can’t assemble my own pack. I need your help!
Thanks
I really don’t have the technical ability to make the ‘pleo’ battery, would it be possible to have one made and to pay for it?
Thank you
Belle
Hello Belle,
Sorry, I can’t make one. I’m just not in that kind of business.
I think you can buy on from ebay for about $40. They also sell LiPo batteries for about $50 – they should last longer.
Andrey
I can do it but I need more information about the origonal battery. The dealer is not selling the battery.
We went back over our construction and found one wire mis-wired. It works GREAT now. The Tenergy batteries did great and lasted 1 hr and 50 minutes before we had to recharge! We are thrilled! Thanks for posting this and helping us troubleshoot.
My Pleo is dead. Well, Pleo worked great one day as stated above. After that, no matter which battery we put in, Pleo would last for 5 minutes. . . then 3. . . then less. . and less. At one point I got the brilliant idea that I hadn’t fed him in ages. He pepped up and started chomping on his leaf. . . and then he went to sleep. I wonder if we starved him to death. It acts like it did when we had the resister mis-wired in his homemade battery, but now he is like that all the time. Perks up and then goes right to sleep. Has anyone else had this problem? I am thinking it is NOT connected to the home made battery.
I have meant to come back and update. My Pleo is alive again! i bought a new battery from Innvo Labs and it slowly came back to life. I made sure I fed him and all is well. There is still a mystery though. . . now Pleo works with my old batteries again too. The original battery from Ugobe works fine and the homemade battery works fine. But neither of these would bring him back to life when he died.