-
5. Attach the optional wireless video camera
 The routerbot we almost have built is self-sufficient, but you can get more fun with it if you put an inexpensive wireless camera on top of it. This post describes how you can do that. Before you proceed please make sure you have read the Routerbot v1 project outline.
Please note that the camera we’re about to attach is not a web camera. It will be able to send video to your TV, but not the browser. If you want video in the browser please proceed with Routerbot v2 project. v1 is really good for exploring your apartment or backyard, but not your premises surveillance from overseas.
You can get an inexpensive wireless pinhole camera at ebay for about $30 shipped. You can also decide that you want a camera with IR LEDs that make it work well in complete darkness. Local laws permitting you even can get one with a built-in microphone, so you can send your routerbot as a scout into the darkest closet in your house to look and listen if there is anyone there. Kids would love that!!
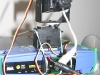
The camera can be attached directly to the router enclosure, but it would make more fun if you attach it to the top with two regular servos as it is shown on the photo. BTW, with pan&tilt camera your routerbot also gets a “head” and this will allow it to express more emotions.
Wireless camera mounted on routerbot
As you can see on the photo I used a separate 9V battery to power the camera, but you can actually draw the power from the same 9.6V battery. Either solder the wires to the Battery Cable or connect to port VS1 or VS2 on the servo controller. If you are ready to invest a few more bucks into this project using a single LiPo battery of high capacity for the entire robot would be even better idea.
A few words about wiring. If you connect the tilt servo to port 4 and pan servo to port 5 of your SSC-32 controller it will work with the Routerbot automagically. Should you choose to use different PWM ports you will need to edit config.sh file. Remember that ports are numbered starting from 0 and the black wire should be connected to the ground pin.Now your router is ready to be fine-tuned.


 RSS
RSS Contact Us